For editors who have experience working in audio studios, one of the most painful things about working with NLEs is the audio. Even the best audio subsystem within any video editing system I’ve seen leaves plenty of room for more accurate, less frustrating, and more capable software.
But even when the budget allows sending a show to a mixer who’s got better ears, better software and a quieter room, you still need to make your project sound good along the way. We do this is by a combination of clicking on the mixer windows, or dragging volume level automation up and down in our timelines. This is clearly a sucker’s approach, and extremely frustrating.
The alternative has been to drop a close to grand (or more!) on what’s called a “control surface” – a set of sliders that work like a mixing board and hopefully are “flying”, that is, motor controlled to mimic the position of the faders on screen. There are some surfaces that are less expensive, especially if you’re willing to deal with the faders not being motorized, and thus not maintaining a position related to the value onscreen.
But it’s 2012, and so we’re done with the clicking, and we’re not spending the money on the dedicated hardware, at least I’m not.
iPad Control Surfaces with Final Cut Pro X:
FCP X doesn’t have a mixer window. Move along.
iPad Control Surfaces with Final Cut Pro 7:
If you’re cutting on FCP 7, there is a super easy solution. FCP 7 (& 6) supports the Mackie HUI protocol, and thankfully, there is a software tool in the app store that emulates that.
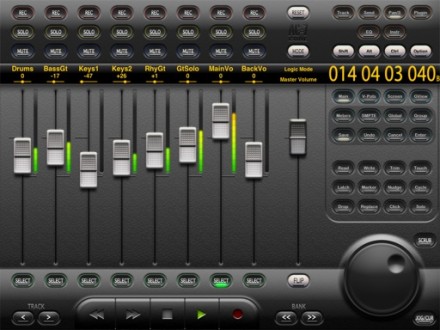
Mac OS 10.6 and 10.7 included a facility to connect MIDI devices over WIFI, so that’s what you do- use the AUDIO MIDI app on your Mac to connect to the iPad. Then, you go to the Control Surface menu item in FCP, hit the Add surface button, select the available connection, and voila. You should see the first eight channels of your mix mimicked on the iPad screen.
Move a fader. The fader in FCP moves. Tap solo for track 2. Track 2 solos. As you play your sequence, the faders animate, and at any time you can adjust as necessary.
It’s a much more intuitive way to mix than using the mouse, and allows you to adjust several tracks at once. You can switch on an option in FCP to record your slick fader moves to keyframes, so you can dip music around dialog quickly, and ramp music in an emotional way.
I’ve been using AC-7 CORE, and it’s predecessor, AC-7 MIDI basically since the first iPad came out. It’s reliable, only very occasionally getting weird. There are times when nothing is active on a track and the fader will stay at unity rather than zero. Also, the top of the iPad fader range maps to +10, not +12. You’ll get over that. The main issue is that the iPad wants to drop the WiFi connection when possible, so the best way to work is to keep the iPad plugged in and to set it not to go to sleep.
If you’re working on a show with more than 8 audio tracks,you access those by tapping the ‘bank’ button on screen. There are also a few other buttons that are active but realistically I rarely use them. This app will also work as a remote control for your FCP system if you want to view from across the room. You even get an accurate time code display from your timeline.
Part 2 of this post will explain how to do something similar on Avid Media Composer.

